Disclosure: This post may contain affiliate links, meaning I get commission if you decide to make a purchase through my links, at no cost to you. Please read my Affiliate Disclosure for more information.
Well, let me start by saying that when I got my first ever floral event booking, I was absolutely chuffed. I’ll admit it was a family affair—and a bit of a freebie—but that didn’t diminish my excitement (or worry) one bit. The event was set for the end of June, a tricky time for flowers in the UK, but also a bit troublesome because, as any gardener worth her secateurs knows, keeping flowers fresh and fabulous over several days can be a bit of a nightmare.
As I started planning, I wanted to make sure my approach was sustainable and in line with my love for seasonal gardening. And that’s when the idea of using dried flowers hit me like a ton of compost bags. Not only would they last the full three days of the event, but they also ticked all the boxes for sustainability. Plus, who wouldn’t love the idea of creating gorgeous dry flower party decorations that could be kept and admired long after the festivities had ended?
The Design Brief: Planning the Floral Installation
The event was to be held in Anglesey, a stunning location that would see three days of celebrations. This meant that the flowers needed to look good for more than just one day—no pressure, right? The party’s main event was set to take place in a large tent, but here’s where things got tricky: I had no idea how tall the tent would be or how much weight it could support.
My initial thoughts were to create a hanging installation similar to a Christmas decoration I’d made of dried allium heads. This was admired by my sister-in-law, whose party it was. It worked brilliantly in a small, intimate space, but for a grand party in a tent? Not so much.
Three questions. Two minutes. A flower list chosen for your actual garden, not some idealised one.
Let’s find your flowers.


After a few rounds of “what ifs”, and more than a bit of worrying about how many flowers I would need and how would I keep the flowers fresh over several days, I stumbled upon a moss-covered stick in the garden that practically begged to be used. It had character, a touch of nature, and a good length to fill the space without adding too much width or height.
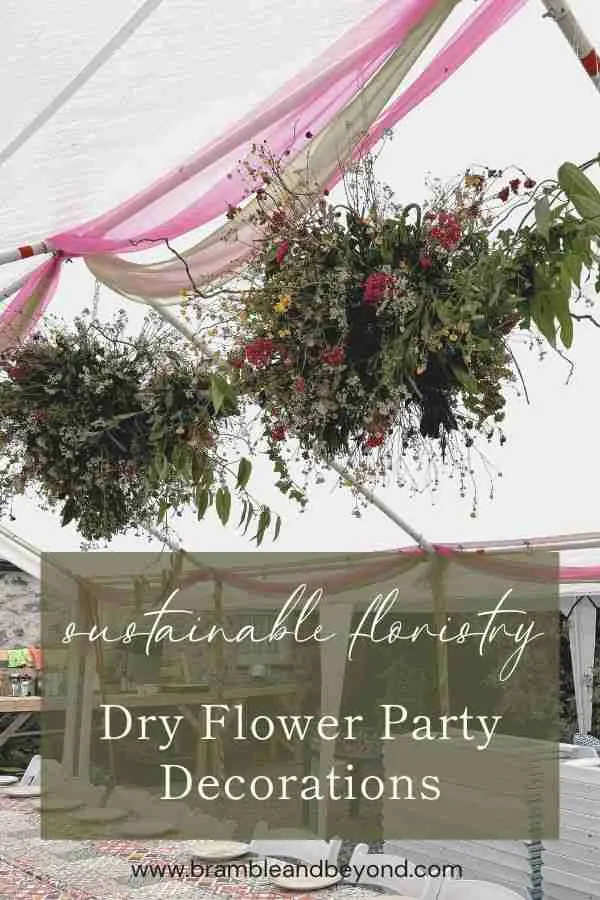
I decided to adorn it with globes of flowers and some drapey bits to keep things looking natural. This design would hopefully fill the tent’s length without making the space feel overcrowded. The beauty of it? It was simple, effective, and could be entirely sustainable.
Understanding Eco-Friendly and Sustainable Floristry
Now, let’s talk about why I was so determined to make this installation as eco-friendly as possible. Sustainable floristry is all about making choices that are kind to the environment. One of the biggest no-nos in this field is floral foam—a florist’s go-to for years, but an environmental disaster. It’s essentially plastic, and once used, it goes straight to landfill, where it can take centuries to break down. It also produces micro-plastics in our water system which is harmful for many of the creatures living in our water systems. So, floral foam was out of the question for this project.
This post from Phillipa Craddock gives some good examples of different mechanics that can be used that are sustainable.
Another key aspect of sustainable floristry is using locally grown flowers. Now, I was asked to do this event in the winter, which meant I had some time to plan. I sowed hardy annuals in the ground, hoping they’d be ready in time. But, as fate would have it, the slugs had other ideas, and my garden was practically ravaged. So, come spring, I was starting from scratch again.
Unfortunately, I wasn’t confident that I would have my spring sown annuals flowering by the end of June. This is where the idea of drying flowers came in—suddenly, it seemed like the perfect solution. Not only would dried flowers last longer, but they’d also reduce the need for constant watering and maintenance. And at this point all of the hedgerows were full of cow parsley and buttercups by the armfuls.
Selecting the Right Flowers for Drying
Choosing the right flowers for drying is both an art and a science. For this project, I needed a mass of flowers that would also maintain their colour and shape once dried. Since I was on a bit of a tight schedule (and budget) and needed a lot of material, I ended up drying whatever I could get my hands on throughout the spring. Geums, euphorbia, buttercups, cow parsley, and ground elder were some of the seasonal blooms I managed to dry, and they turned out to be perfect for my needs.
The ground elder, surprisingly, dried firmer and kept its colour better than the cow parsley. The buttercups, with their bright yellow hue, also held onto their colour remarkably well. And then there was the orange geum—this one was a gem (pun intended) as it dried beautifully and added a pop of colour to the arrangement.
At the last minute, I cut some evergreen clematis and ivy vines to add that drapey, natural feel to the installation. It’s all about experimenting with what you have and making it work for your specific project. I tested how long these vines would last out of water and a week after hanging it in my garage it still looked good, so I was good to go.
The Mechanics Behind Dry Flower Party Decorations
On the day of the event, the first challenge was getting the stick up into the tent. Thankfully, the tent was much better quality than I’d feared, so I didn’t have to worry about the weight. I used clips and chains to hang the five-foot stick at eye level, which allowed me to work on the arrangement without needing a ladder—a win for my poor back!
The ends of the stick were covered with large balls of chicken wire, which acted as the base for the flower globes. I added a smaller ball of chicken wire in the centre to link the two outer balls, creating a cohesive look.

At this stage, it all looked a bit odd, and I could see my family starting to doubt my vision. But I knew this was just the beginning—it’s amazing what a few flowers can do to transform something from odd to absolutely stunning.
Creating the Dry Flower Party Decorations
Once the structure was in place, it was time for the fun part—adding the flowers! The key here is to poke the flowers evenly around the chicken wire balls so that none of the mechanics are visible. This takes a lot of material—probably more than you think—so it’s good to have plenty of dried flowers on hand.


To add a final pop of colour, I used some pink valerian (Centranthus ruber) that was growing around the property. This was a last-minute addition that really brought the installation to life, and tied in with the other decorations. It was also serendipitous that the family had to prune a bay tree to make room for the toilet and fridge facilities—I used the clippings to add depth and variety to the flower balls.
If you want plenty of flowers without turning gardening into a second job, The Flower Files might be just what you need.

Finally, I draped my vines of clematis and ivy to give the whole thing a more natural, flowing feel.

Even if I say it myself, I was really pleased (and maybe a bit surprised) by the results.
Maintaining Your Dry Flower Party Decorations
One of the main reasons I chose dried flowers was because I thought they’d have a better chance of staying unchanged over the course of the weekend. If I’d used fresh flowers, I’d have needed to figure out how to keep them watered in a warm, busy tent, which wasn’t feasible in this setup.
However, the lovely (read: unpredictable) British weather had other ideas. The windy, rainy, and damp conditions in Anglesey meant that the dry flowers started to wilt a bit over the weekend—a lesson learned for next time!
The fresh flower arrangements that I also created for the event (the requirements grew as time passed!) lasted remarkably well, and looked as good on the last day as they did on the first, even though they had to put up with a deluge of rain and wind.
That said, dry flowers are still ideal if you’re going for a muted, vintage look. They add a touch of rustic charm to any setting and don’t require constant care and attention like fresh flowers do.
The Charm of Dry Flower Party Decorations
Incorporating dry flower party decorations into your party or event décor is a beautiful way to embrace sustainable gardening practices. Not only do they last longer, but they also add a unique, timeless appeal to your space. Plus, they’re a brilliant way to make use of flowers that might otherwise go to waste.
So, why not give it a go? Experiment with your own creations, and don’t be afraid to get creative with the materials you have on hand. As the saying goes, “The earth laughs in flowers”—and with sustainable, seasonal gardening, you can make sure that laughter continues for seasons to come.
I’d love to hear from you! Have you tried creating your own dry flower decorations? Share your tips and tricks in the comments below, and let’s inspire each other to keep our gardens and our celebrations eco-friendly and beautiful.
A quick aside: I built a little app for flower growers who want gentle reminders about what to do and when - without it turning into another thing to feel guilty about. It's called the Flower Grower Companion. You tell it your location and your flowers, it tells you what actually needs doing this week (and just as importantly, when there's nothing to do at all)
Have a look